

Key Points
- The Logistics Tent blueprint can now be obtained after defeating the Guardian of Minerva.
- Then, visit your workbench to place the Logistics Tent at your base.
- Once done, you can now automate your buildings to seamlessly produce and store goods.
Since you need to take care of production in Romestead, this would have left you with little to no space for exploration and other activities. Luckily, once you have the Logistics Tent, you can automate buildings to produce and supply goods around your base.
Read More: Romestead – How to Make Flour and Bread
Romestead – Logistic Tent Overview
| How to get | Defeat Guardian of Minerva |
| Required materials | 6x wood, 4x stone |
| Use | Connect production buildings for automation |
How to Get the Logistics Tent
The Logistic Tent is a crucial component for starting to trade, as it allows you to automate the transfer of items and goods between buildings at your base. After defeating the first boss in the game, the Guardian of Minerva, you will obtain the blueprint to craft the Logistics Tent.
Earlier, the Pyzifax boss would drop the Logistics Tent blueprint, but I could get it quite early after the latest patch update. Once you have the blueprint, you just need 6x wood and 4x stone to craft and place the Logistics Tent from the Workbench menu.
How to Use the Logistics Tent

After putting up the tent, you will find that all your production buildings will have two different arrows on them. You will spot an up arrow and a down arrow. The green up arrow is the input arrow that can receive materials from other buildings. But if you want to export items to a building, then you need to utilize the red down arrow on the building to send materials.
Some buildings are purely production-based, like the Clay Pot or the Lumber Mill. These buildings only have the red output arrow and no input arrow. Connect them to storage or to any building that needs these materials. Drag the red output arrow and drop it on the green input arrow of another building.
This will take you to the Create Connection menu, where you select the Repeating option to repeatedly send materials to this particular building automatically. Then, select the Resources option, as the materials that will be transported are items that would generally require a cart. Once done, the items will start shifting from one building to the other until the resources from said building are exhausted.
How To Automate Buildings
You can connect multiple buildings to one input building this way, which is a great way to automate materials to send to static areas like the Storage. But if you are moving materials to production houses, like the Bakery, then you need to pick different options in the Create Connection menu.
For example, if you are moving wheat to the water mill to create dough, then you need to connect the farmstead to the water mill. Select the Items option in the menu to help the building store the materials as inventory and use them up once the initial production is done.
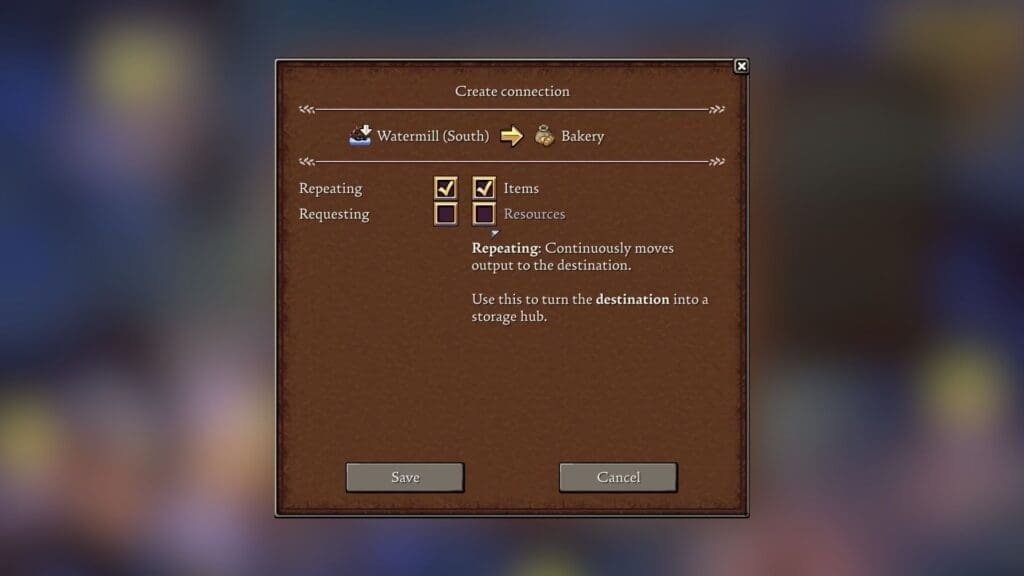
Then, connect the water mill to the bakery, then head over to the bakery and select the worker to gain access to the bakery menu. Select the Bread option, then click on the Repeat option at the bottom of the menu.
This will automate the bakery to produce bread, as long as there is flour production. Once bread production is done, connect the bakery to the storage to store the bread for consumption.
Read More: Romestead – How to Get the Drum and Lyre
FAQs
Can I automate buildings between different bases?
Currently, you cannot transport goods automatically between bases in different regions.
How do I identify which option to pick within the Create Connection menu?
The options that you can pick will be highlighted while the other options will be blacked out automatically, and this will depend on the type of building and the resource it produces.
What happens once the resources within the buildings are exhausted?
Once resources are exhausted, production will be halted until you get the resources replenished.