

Key Points
- Elendor has 33 Treasure Chests and 5 Oz’s Puzzle you need to find in Mongil: Star Dive.
- These Treasure Chests and Oz’s Puzzles are scattered across 11 locations in Elendor.
- Finding all Treasure Chests and Oz’s Puzzles will unlock a special Achievement at the end.
Mongil: Star Dive’s first region, Elendor, is full of secret Treasure Chests and Oz’s Puzzles that reward Gold, Starlight Crystals, Enhancement Stones and more useful items. Some of these Chests and Oz’s Puzzles are connected, which makes the search for them trickier.
I recommend using the Warp Devices to make the hunt more convenient. Following them will lead to both the Treasure Chests and Oz’s Puzzles in Elendor, so here’s a guide to find them all in Mongil: Star Dive.
Mongil: Star Dive – Elendor Treasure Chests & Oz’s Puzzles Overview
| No. of Treasure Chests | 33 |
| No. of Oz’s Puzzles | 5 |
| How to Solve | Using the riddles at Oz’s Magic Tomes. |
1. All Hananis Treasure Chests & Oz’s Puzzle (Elendor)

Hananis is the first location in Elendor, where you’ll encounter five Wooden Treasure Chests. Here’s a table detailing their locations and rewards in Mongil: Star Dive:
| Chest | Location | Reward |
| Wooden Treasure Chest 1 | From the Hananis Warp Device, head right to find this Treasure Chest inside the alchemist shop. | – 12,500x Gold – 3x Basic Enhancement Stone – 10x Starlight Crystals |
| Wooden Treasure Chest 2 | Exit the alchemist shop and take the path to your right. At the end of the path, break the crates to find this Treasure Chest. | – 12,500x Gold – 3x Basic Enhancement Stone – 10x Starlight Crystals |
| Wooden Treasure Chest 3 | From the second Chest location, run straight and wrap around the house to the stairs on your left. Climb the stairs and go right. Head down the stairs and take the left path to find this Chest at the corner of the house. | – 12,500x Gold – 3x Basic Enhancement Stone – 10x Starlight Crystals |
| Wooden Treasure Chest 4 | After opening the third Chest, take the path to your left and go straight until you reach the end. Drop down to the area below and destroy the crates on your left to find the fourth Chest in Mongil: Star Dive. | – 12,500x Gold – 3x Basic Enhancement Stone – 10x Starlight Crystals |
| Wooden Treasure Chest 5 | For the last chest, follow the path opposite to the fourth Chest. Climb the stairs to your right, then keep heading left. You’ll find another flight of stairs to the right. Climb it and find the final Chest on the platform above. | – 12,500x Gold – 3x Basic Enhancement Stone – 10x Starlight Crystals |
Oz’s Puzzle: There are no Oz’s Puzzles in Hananis, so once you find all the Treasure Chests, travel to the Ventus Forest for the next set of Wooden Treasure Chests in Mongil: Star Dive.
2. All Ventus Forest Treasure Chests & Oz’s Puzzle (Elendor)
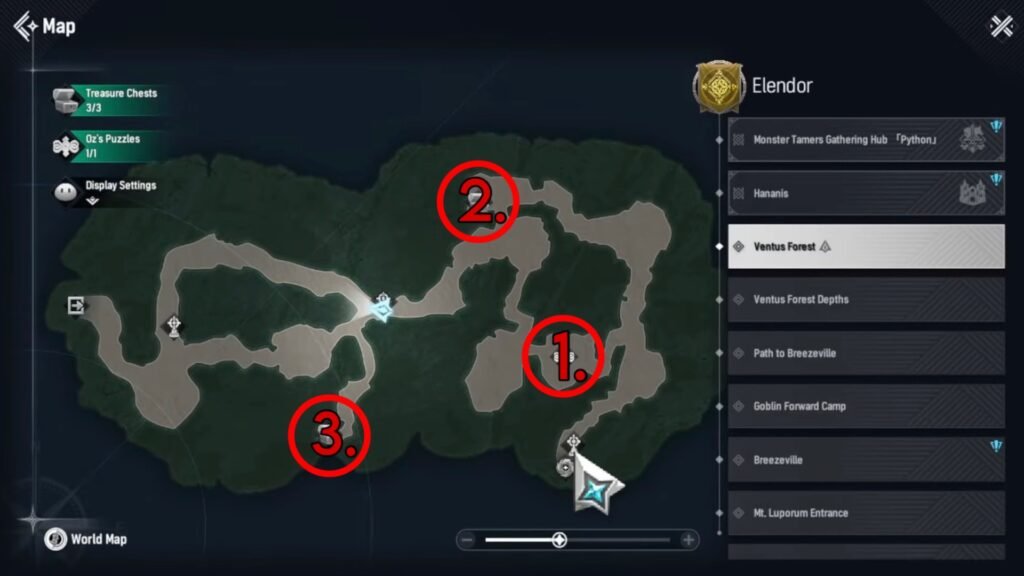
Ventus Forest has three Treasure Chests and one Oz’s Puzzle in Mongil: Star Dive. Funnily, the first Chest is connected to Oz’s Puzzle, so here’s where you can find all of them:
| Chest | Location | Reward |
| Forgotten Puzzle Chest 1 | From the Ventus Forest Entrance Warp Device, head forward and take the narrow path to your left. Use the Wire to climb onto the platform and solve Oz’s Puzzle to open the first Chest here. For the solution, check below. | – 1x Compass of Promise – 1x Crest of Wisdom – 1x Cord of Fate – 20,000x Gold – 5x Basic Experience Book |
| Wooden Treasure Chest 2 | After opening the previous Chest, move forward and drop down. Take the path to the right until you come across another Wire. Use it to climb up and open the Treasure Chest located to your left. | – 12,500x Gold – 3x Basic Experience Book – 5x Common Enhancement Stone – 10x Starlight Crystals |
| Wooden Treasure Chest 3 | Drop down to your left, then take the large path on your right. Follow it until you reach the second Warp Device. Take a left from there, defeat the Cappies inside and open the final Treasure Chest in this location. | – 12,500x Gold – 3x Basic Experience Book – 5x Common Enhancement Stone – 10x Starlight Crystals |
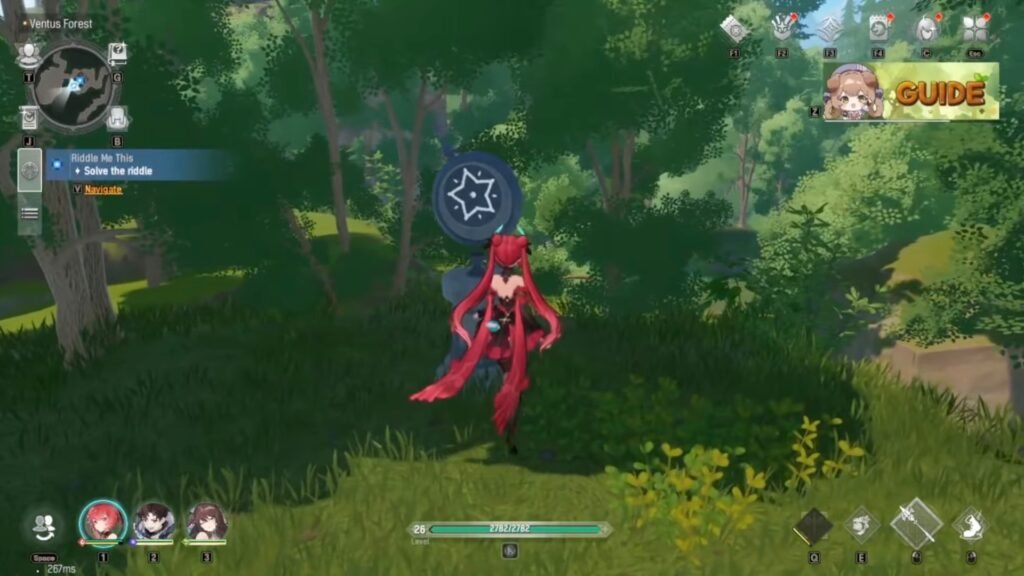
Oz’s Puzzle: It’s located exactly where the first Chest is. Interact with the Magic Tome to find the riddle, “Celestial bodies move in accordance with the laws of nature.” Next, press 3 Oz’s Switches in this order: Sun, Star, and Moon (from left to right). This spawns the Forgotten Puzzle Chest in the Ventus Forest in Mongil: Star Dive.
3. All Ventus Forest Depths Treasure Chests & Oz’s Puzzle (Elendor)

There are four Chests to find in the Ventus Forest Depths, and here’s where they are in Mongil: Star Dive:
| Chest | Location | Reward |
| Wooden Treasure Chest 1 | Use the Slimelet Habitat Warp Device to travel to the Ventus Forest Depths. Follow the path ahead and take the bridge to the right of the Slimelets. Continue on the path, then take two rights and drop down to find the first Chest. | – 12,500x Gold – 3x Basic Experience Book – 5x Common Enhancement Stone – 10x Starlight Crystals |
| Silver Treasure Chest 2 | Jump up the platform and exit the area. Then, take the right path until you reach some Slimelets and a Spark Slime. Enter the first cave to your right, follow the path inside, then take another right to find the Silver Treasure Chest. | – 1x Compass of Promise – 1x Cord of Fate – 3x Basic Enhancement Stone – 4x Basic Experience Book – 20x Starlight Crystals |
| Wooden Treasure Chest 3 | Exit the area, not the cave, and follow the path to your right until you reach the second Ventus Forest Depths Warp Device. Follow the path to the right, then head left to reach an opening with white markings. Behind the Slimelets, you’ll find this Treasure Chest in Mongil: Star Dive. | – 12,500x Gold – 3x Basic Experience Book – 5x Common Enhancement Stone – 10x Starlight Crystals |
| Golden Treasure Chest 4 | Exit the area, then take the leftward path. Drop down to the area below, and go right. Take another left and follow the path until you reach the Flaming Ferns. Follow the path on the left, cross the stones with the markings, then find the Chest to your right. | – 1x Compass of Destiny – 3x Compass of Promise – 4x Cord of Fate – 5x Basic Experience Book – 5x Basic Enhancement Stone |
Oz’s Puzzle: Similar to Hananis, there’s no Oz Puzzle in the Ventus Forest Depths, so move on to the next location in Mongil: Star Dive.
4. All Path to Breezeville Treasure Chests & Oz’s Puzzle (Elendor)
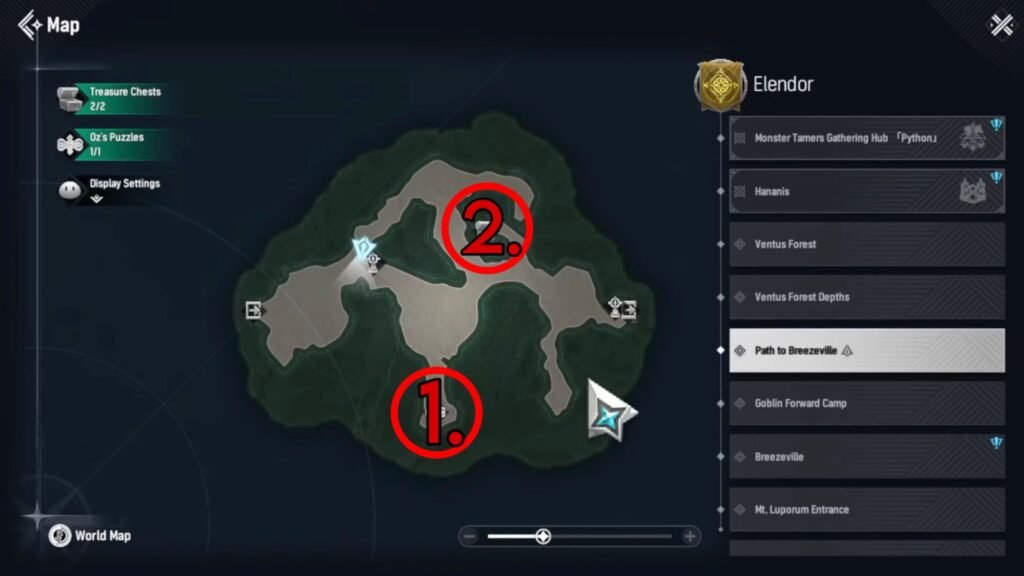
You’ll find just two Treasure Chests on the Path to Breezeville, and one of them is connected to Oz’s Puzzle here. So, take a look at where you need to go in Mongil: Star Dive:
| Chest | Location | Reward |
| Wooden Treasure Chest 1 | Use the Boulder Path Warp Device to enter Path to Breezeville. Go forward and take the narrow path to your right to find this Chest in Mongil: Star Dive. | – 12,500x Gold – 3x Basic Experience Book – 5x Common Enhancement Stone – 10x Starlight Crystals |
| Forgotten Puzzle Chest 2 | Exit the area, and go right. Shortly after, take the path to your left to reach the Wire. Use it to climb up, and you’ll encounter Oz’s Puzzle here. Solve it to open the final Treasure Chest here. For the solution, scroll down below. | – 1x Compass of Promise – 1x Crest of Wisdom – 1x Cord of Fate – 20,000x Gold – 5x Basic Experience Book |
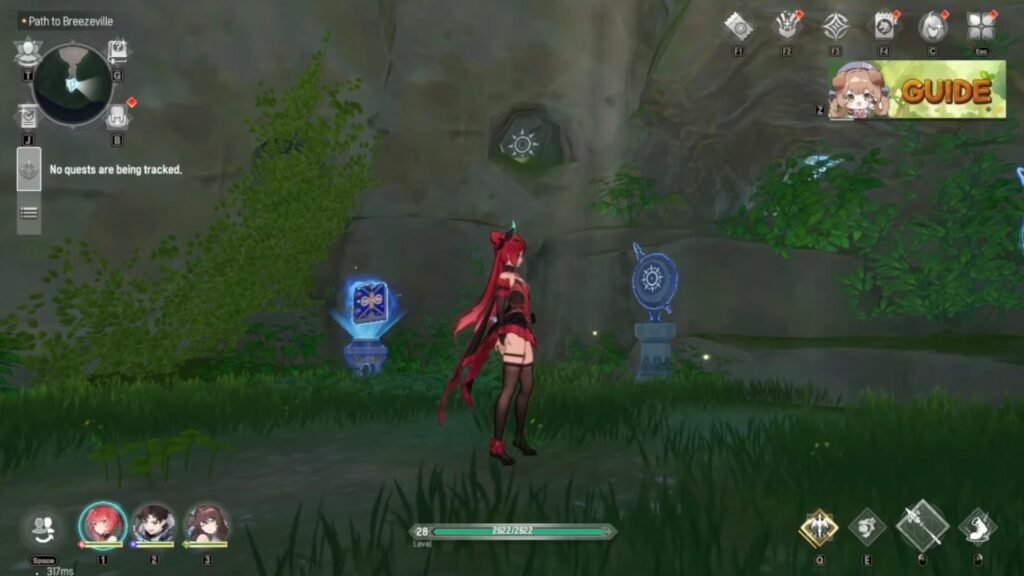
Oz’s Puzzle: Interact with Oz’s Magic Tome to view the riddle: “The answer to many of the world’s problems often lie buried deep inside a small hole.” Look towards the upper right to find a small hole with the answer: the Sun. Hence, interact with Oz’s Switch with the Sun emblem located at the far right of Oz’s Magic Tome to solve the puzzle in Mongil: Star Dive.
5. All Breezeville Treasure Chests & Oz’s Puzzle (Elendor)
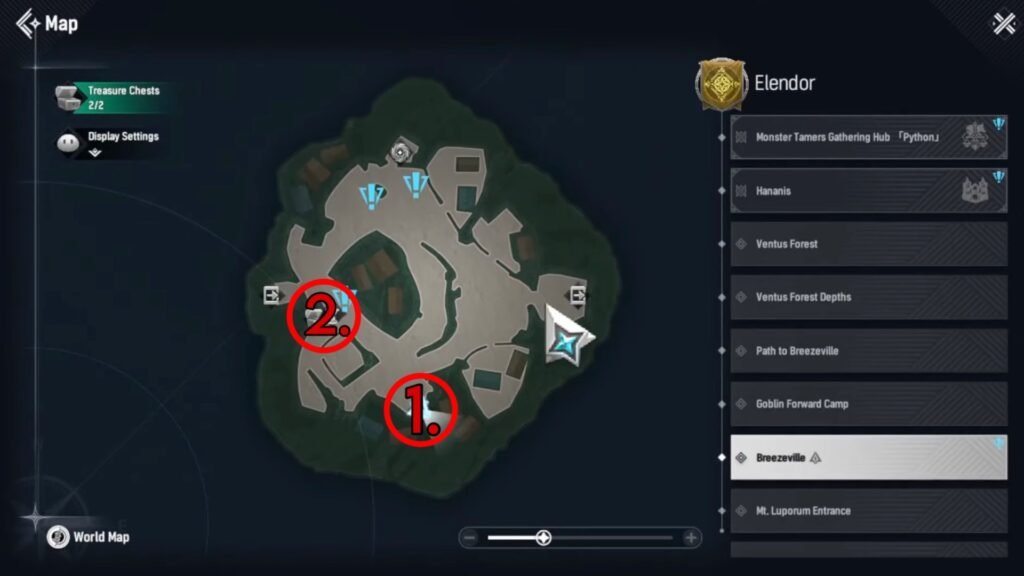
There are only two Treasure Chests in Breezeville, and they’re located close to each other, so here’s how you can find them in Mongil: Star Dive:
| Chest | Location | Reward |
| Wooden Treasure Chest 1 | Fast-travel to the Breezeville Warp Device and open the Treasure Chest located right behind it, near the house in Mongil: Star Dive. | – 12,500x Gold – 3x Uncommon Experience Book – 10x Starlight Crystals |
| Wooden Treasure Chest 2 | From the first Chest, take the path to your left. As you’re moving uphill, take another left and enter the large clearing with the houses to find the last Chest hidden in a bush near the wooden fences. | – 12,500x Gold – 3x Uncommon Experience Book – 10x Starlight Crystals |
Oz’s Puzzle: Thankfully, there’s no Oz’s Puzzle here to solve, so move on to the Goblin Forward Camp in Mongil: Star Dive.
6. All Goblin Forward Camp Treasure Chests & Oz’s Puzzle (Elendor)
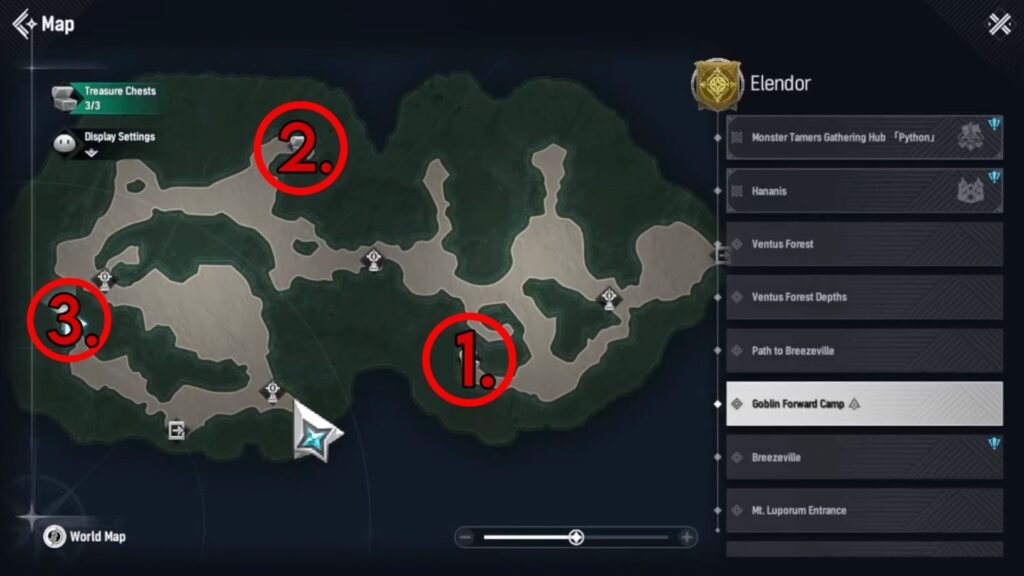
You’ll find three Chests and many groups of Goblins at the Goblin Forward Camp. To avoid combat with them, here’s where you need to go in Mongil: Star Dive:
| Chest | Location | Reward |
| Wooden Treasure Chest 1 | Start from the Goblin Caution Zone Warp Device and follow the leftward path. Head straight, past the group of Goblin Recruits, to find the Wooden Treasure Chest. | – 12,500x Gold – 3x Basic Experience Book – 5x Common Enhancement Stone – 10x Starlight Crystals |
| Wooden Treasure Chest 2 | Next, fast-travel to the Goblin Watchtower Warp Device, then take the path to your right. Walk past the Goblin Recruits to find the Wooden Treasure Chest to your right. | – 12,500x Gold – 3x Basic Experience Book – 5x Common Enhancement Stone – 10x Starlight Crystals |
| Wooden Treasure Chest 3 | Fast-travel to the Mt. Luporum Entrance Road Warp Device and follow the path straight ahead. You’ll find this Treasure Chest at the end. | – 12,500x Gold – 3x Basic Experience Book – 5x Common Enhancement Stone – 10x Starlight Crystals |
Oz’s Puzzle: Similar to Breezeville, there’s no Oz’s Puzzle here, so prepare for the Mt. Luporum Entrance Chests and Oz’s Puzzle in Mongil: Star Dive.
7. All Mt. Luporum Entrance Treasure Chests & Oz’s Puzzle (Elendor)
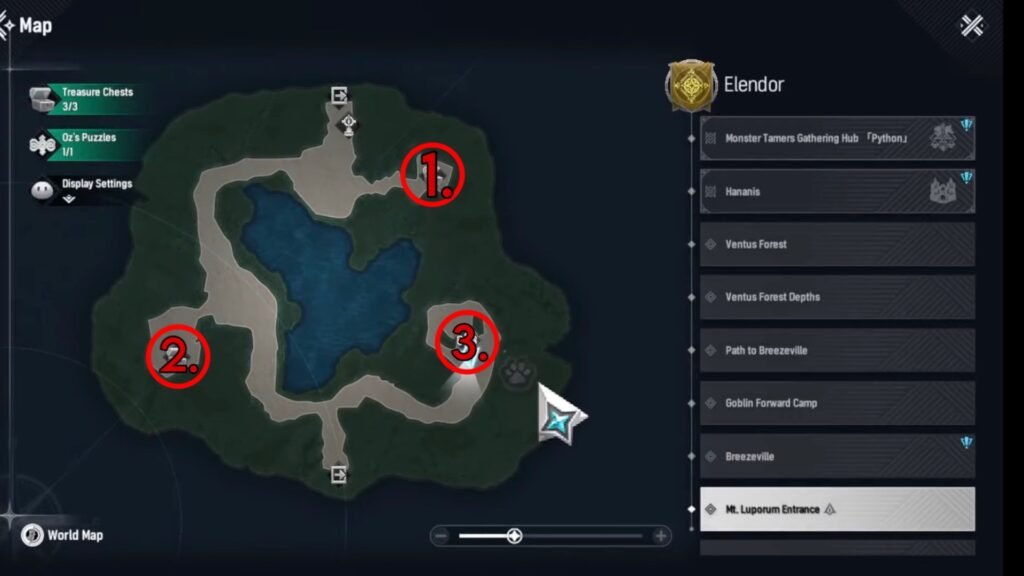
The Mt. Luporum Entrance in Mongil: Star Dive has three Chests, and one of them is tied to Oz’s Puzzle, so here’s what you need to do:
| Chest | Location | Reward |
| Wooden Treasure Chest 1 | Fast-travel to the Mt. Luporum Warp Device and follow the path to the left with the Spirit Mushrooms to find the first Treasure Chest. | – 12,500x Gold – 3x Basic Experience Book – 5x Common Enhancement Stone – 10x Starlight Crystals |
| Wooden Treasure Chest 2 | Exit the area and follow the path around the water body and past the Corrupted Goblin Recruits until you reach the Slimelets. You’ll find the second Treasure Chest behind these Slimelets. | – 12,500x Gold – 3x Basic Experience Book – 5x Common Enhancement Stone – 10x Starlight Crystals |
| Forgotten Puzzle Chest 3 | Now, head towards the Corrupted Goblin Recruits and take the path to your right, circling the body of water. At the end of the path, you’ll encounter Oz’s Puzzle. Solve it to find the final Treasure Chest here. For the solution, read below. | – 1x Cord of Fate – 1x Compass of Promise – 1x Crest of Wisdom – 3x Basic Enhancement Stone – 25x Starlight Crystals |
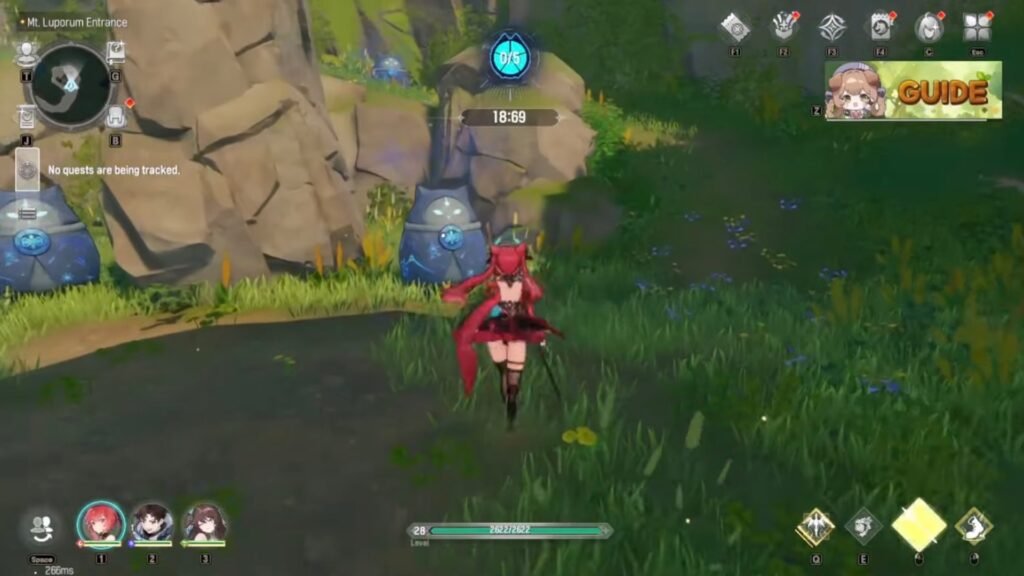
Oz’s Puzzle: Interact with Oz’s Magic Tome to display the riddle: “Cats don’t wait long.” This spawns 5 Cat statues in the area. The first two are near the Magic Tome, while the other two are on an elevated platform above. The final one is at the top of the centre pillar, so use a ranged attack here. You’ll have 20 seconds to destroy all 5 Cat statues and spawn the Chest in Mongil: Star Dive.
8. All Valley of Trials Treasure Chests & Oz’s Puzzle (Elendor)
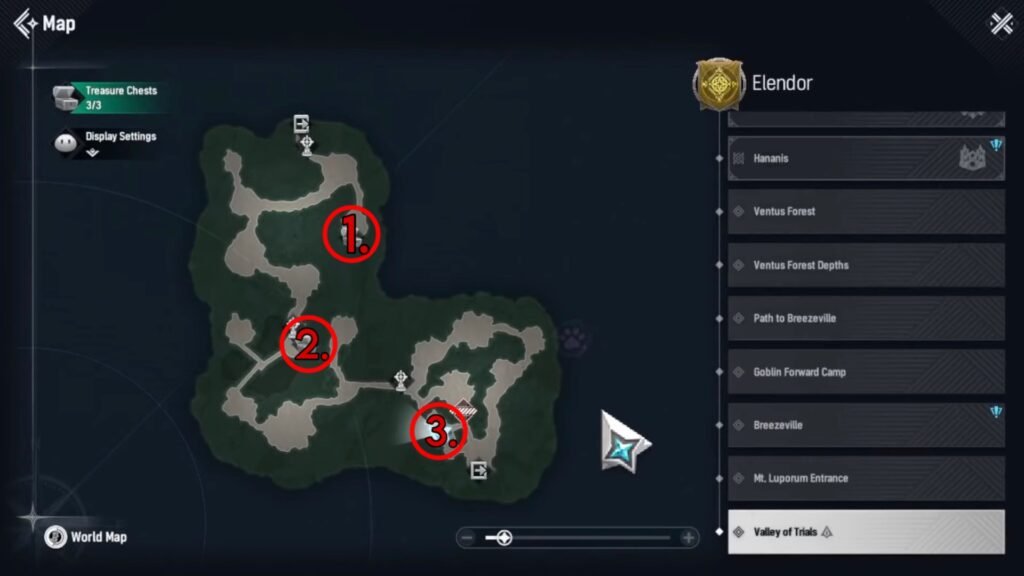
You’ll encounter three Wooden Treasure Chests at the Valley of Trials, and here’s a table detailing their locations and the rewards you’ll obtain in Mongil: Star Dive:
| Chest | Location | Reward |
| Wooden Treasure Chest 1 | Fast-travel to the Valley of Trials Warp Device and take the path to your left, past the Corrupted Slimelets and the Corrupted Spark Slime. At the end, you’ll find this Treasure Chest past a group of Digger Moles. | – 12,500x Gold – 3x Basic Experience Book – 5x Common Enhancement Stone – 10x Starlight Crystals |
| Wooden Treasure Chest 2 | Next, fast-travel to the Incredibly Dangerous Bridge Warp Device and open the Treasure Chest located directly to the right. | – 12,500x Gold – 3x Basic Experience Book – 5x Common Enhancement Stone – 10x Starlight Crystals |
| Wooden Treasure Chest 3 | Finally, fast-travel to the Mole Spawn Zone Warp Device and follow the path to the right. Head past the large clearing, then take another right through the narrow opening to find the last Treasure Chest here. | – 12,500x Gold – 3x Basic Experience Book – 5x Common Enhancement Stone – 10x Starlight Crystals |
Oz’s Puzzle: No Oz’s Puzzle here to solve, so fast-travel to the Isthmus Cave in Mongil: Star Dive.
9. All Isthmus Cave Treasure Chests & Oz’s Puzzle (Elendor)
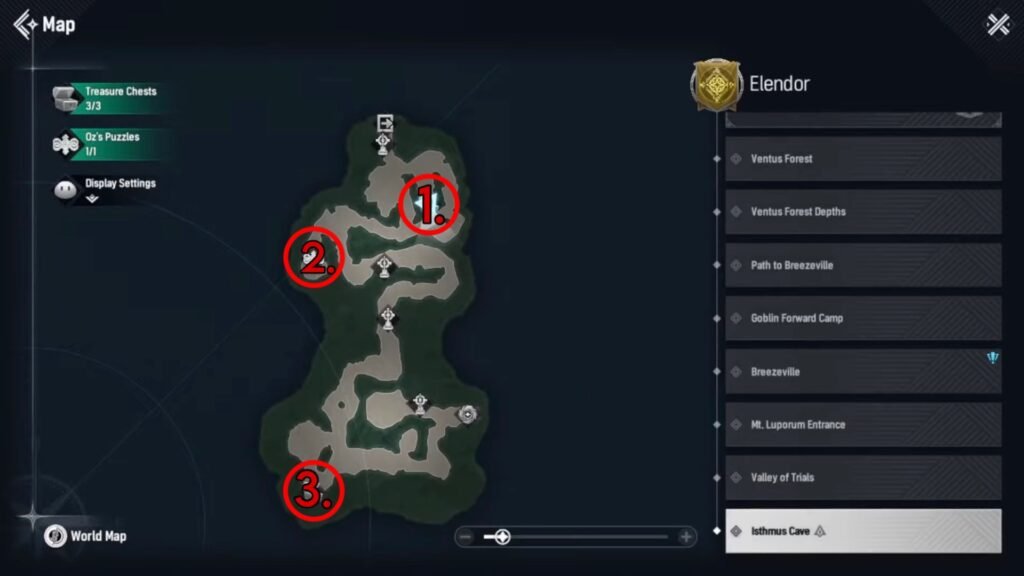
Isthmus Cave contains three Treasure Chests, and you must solve Oz’s Puzzle to unlock one. So, take a look at the locations you need to travel to in Mongil: Star Dive:
| Chest | Location | Reward |
| Silver Treasure Chest 1 | Fast-travel to the Isthmus Cave Entrance Warp Device, then take the path to the left, past the Corrupted White Wolves. Follow the path and head left to reach the Digger Moles. You’ll find this Chest here. | – 1x Compass of Promise – 1x Cord of Fate – 3x Basic Enhancement Stone – 4x Basic Experience Book – 20x Starlight Crystals |
| Forgotten Puzzle Chest 2 | Go back the way you came from, then take a right. Follow the path up ahead to reach Oz’s Puzzle here. Solve it to unlock the second Treasure Chest. For the solution, check below. | – 1x Cord of Fate – 1x Compass of Promise – 1x Crest of Wisdom – 3x Basic Enhancement Stone – 25x Starlight Crystals |
| Wooden Treasure Chest 3 | Fast-travel to the Where Light Seeps In Warp Device and follow the path to the right. Continue forward until the end to find the third Treasure Chest here. | – 12,500x Gold – 3x Basic Experience Book – 5x Common Enhancement Stone – 10x Starlight Crystals |
Oz’s Puzzle: Interact with Oz’s Magic Tome for the riddle: “Resonate with the element contained in the crystal.” You need to attack 3 Crystals in the area using a Fire Element to solve this puzzle. The first Crystal is located near the Magic Tome, the second is to the right, and the third is found on the platform above. Take the upward path to the left to reach it and complete this puzzle in Mongil: Star Dive.
10. All Hunter’s Path Treasure Chests & Oz’s Puzzle (Elendor)
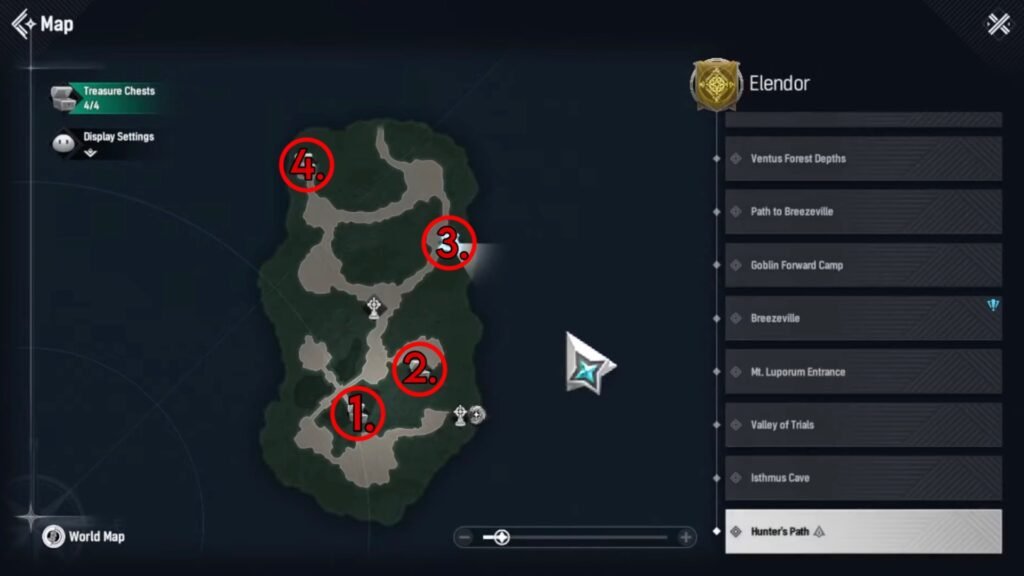
Hunter’s Path has four Treasure Chests, which lie on a direct route, so here’s how you can find all of them in Mongil: Star Dive:
| Chest | Location | Reward |
| Wooden Treasure Chest 1 | Fast-travel to the Isthmus Cave South Path Warp Device and follow the path to the left, past the clearing with the wooden fences and tents. Continue on the path and take a right to reach the wooden bridge. Take the bridge that leads right to find the Treasure Chest here. | – 12,500x Gold – 3x Basic Experience Book – 5x Common Enhancement Stone – 10x Starlight Crystals |
| Wooden Treasure Chest 2 | Walk back to the centre of the wooden bridge, and go right. Head through the narrow opening to the right past the Digger Moles to find this Treasure Chest near more Digger Mole groups. | – 12,500x Gold – 3x Basic Experience Book – 5x Common Enhancement Stone – 10x Starlight Crystals |
| Wooden Treasure Chest 3 | Exit through the narrow opening, towards the Digger Mole, and take the path to your right. Head past the Warp Device and take the path to the right to reach the third Treasure Chest near more Digger Moles. | – 12,500x Gold – 3x Basic Experience Book – 5x Common Enhancement Stone – 10x Starlight Crystals |
| Wooden Treasure Chest 4 | From the third Chest, follow the path to the left and take another left to reach more Digger Moles. Head past them to the rightward path to reach the last Chest here in Mongil: Star Dive. | – 12,500x Gold – 3x Basic Experience Book – 5x Common Enhancement Stone – 10x Starlight Crystals |
Oz’s Puzzle: There is no Oz’s Puzzle here, so all that’s left to do is find the final Chest and Oz’s Puzzle in Elendor in Mongil: Star Dive.
11. All Natura Monastery Treasure Chests & Oz’s Puzzle (Elendor)
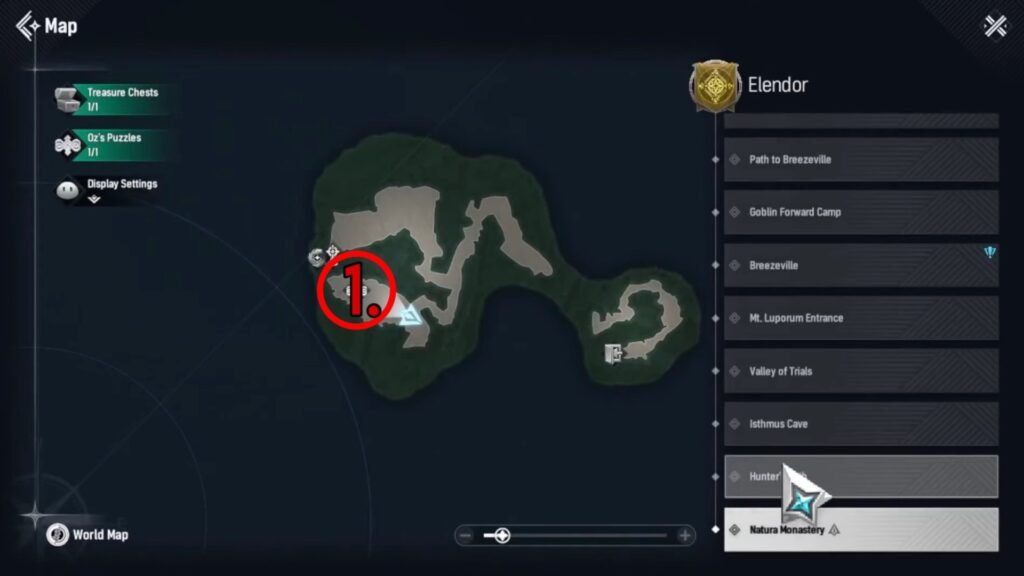
Natura’s Monastery has a single Chest which is connected to Oz’s Puzzle, so here’s the location and the solution to obtain all the rewards in Mongil: Star Dive:
| Chest | Location | Reward |
| Mysterious Puzzle Chest | Fast-travel to the Natura Monastery Warp Device and follow the path ahead. Past the wooden blockade, head right and continue down the narrow path. Slide down and head right to find Oz’s Puzzle in a large clearing. Solve this puzzle to unlock the last Elendor Chest in Mongil: Star Dive. For the solution, check below. | – 1x Standard Enhancement Stone – 1x Crest of Wisdom – 1x Compass of Destiny – 1x Cord of Fate – 50x Starlight Crystals |
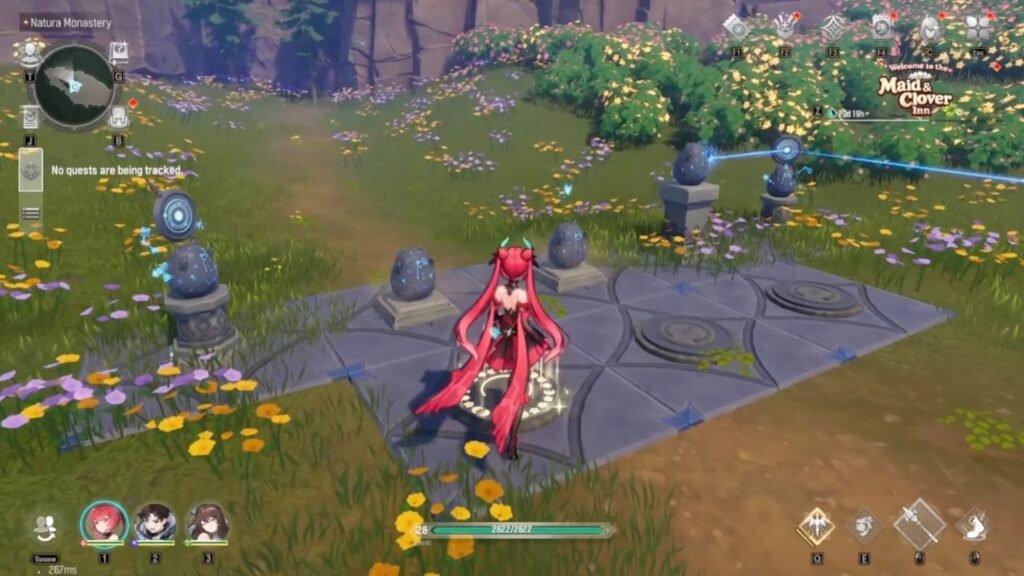
Oz’s Puzzle: Interact with Oz’s Magic Tome to reveal the following clue: “Direct the light to reveal the way forward.” This activates a laser from the right crystal ball. To solve the puzzle, you need to guide the laser to the final egg.
So, step onto the platform to the right, then onto the one to the left, avoiding the platform between to lower the eggs. Lastly, interact with the mirror to your left to complete the puzzle and unlock the final Chest in Elendor in Mongil: Star Device.
FAQs
What else do I get for finding all Treasure Chests in Elendor?
You’ll unlock the Achievement “Treasure? Hunted. – Elendor” for unlocking all Treasure Chests in the Elendor region in Mongil: Star Device.
Do I need to defeat the enemies to open the Chests?
Yes, if enemies such as Slimelets, Digger Moles or Cappies are present where the Chest is located, you need to dispatch them before you can obtain the rewards.
Do I need to open all Elendor Chests for the Achievement?
Yes, you need to open all 33 Chests located in the Elendor region to unlock the Achievement for it in Mongil: Star Dive.