

Key Points
- Floating Crates act as both platforms and weighted objects, not physics props.
- Correct crate placement unlocks all rewards, including a missable Aurylene.
- The puzzle teaches core traversal mechanics reused later in Endfield.
The Floating Crates puzzle in Arknights: Endfield shows up early, but it’s one of those moments where the game quietly checks whether you’re paying attention. I didn’t struggle with it mechanically, but I did see how easy it would be to miss rewards if you rush through it like a standard quest objective.
Arknights: Endfield – Floating Crates Puzzle Overview
| Category | Details |
| Quest name | Rally and Unite |
| Quest type | Main Quest, Exploration Puzzle |
| Region | Valley IV – The Hub |
| Puzzle location | Originium Byproduct Processing Center |
| Required interaction | Activate and reposition Floating Crates |
| Mandatory objective | Unlock the blue chest |
| Optional objective | Collect Aurylene from elevated platform |
| Missable content | Aurylene |
Where Is the Floating Crates Puzzle?
This puzzle shows up during the Rally and Unite main quest in Valley IV, inside the Originium Byproduct Processing Center.
There’s no secret trigger or side quest involved. The story funnels you straight into it, right after combat dies down and the environment opens up. Once you see stacked containers, a low barrier, and an interactable crate nearby, you’re in the right place.
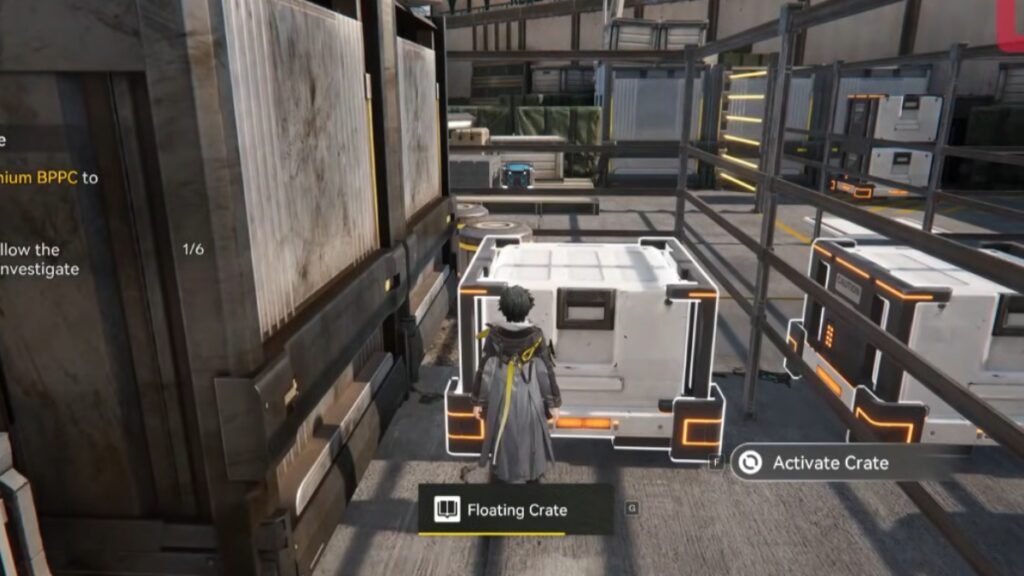
Floating Crates aren’t physics toys. They’re controlled tools. When you activate one, it lifts slightly and follows your movement direction. It won’t clip through walls, fences, or objects, and it doesn’t wobble or slide.
When you drop it, the crate becomes solid again. The game treats it as a platform you can stand on, as well as a weighted object that can hold switches down.
That, in a nutshell, breaks the whole puzzle down.
Step 1: Getting Past the Barrier
The first obstacle is a low industrial barrier you can’t vault normally. Pick up the nearby Floating Crate and guide it right up against the barrier. Drop it so it’s flush with the edge. Climb onto the crate and step over the barrier. That’s it. No tricks here, just controlled elevation.
Step 2: Spotting the Real Objective
Inside the restricted area, you’ll notice two things immediately. There will be a floor pressure switch with yellow markings, as well as a sealed blue chest nearby. Standing on the switch yourself doesn’t work because you need to leave it to open the chest. Hence, the crate will have to be dropped on the pressure switch.
Step 3: Using the Crate on the Pressure Switch
Go back to the Floating Crate and lift it again. Carefully place it directly on top of the pressure switch. Once placed correctly, the switch stays active on its own, and the chest unlocks instantly. If it deactivates when you walk away, the crate isn’t positioned properly.
Step 4: Opening the Blue Chest
With the switch held down, open the blue chest and grab the loot. At this point, the quest technically lets you move on, which is where a lot of players make a mistake. The puzzle isn’t fully done yet.
Step 5: Reaching the Aurylene Above
Above the puzzle area, there’s a stack of containers with an Aurylene sitting on top. You can’t reach it with normal jumps. Reposition the Floating Crate near the stacked blocks. Drop it close enough to act as a stepping stone. Jump onto the crate, then onto the elevated platform, and grab the Aurylene. It’s optional, but very easy to miss if you leave too early.
FAQs
The pressure switch keeps turning off when I walk away. What am I doing wrong?
This usually means the crate isn’t centered properly. From my run, even a small offset can cause the switch to deactivate. Pick the crate back up and drop it squarely within the yellow markings.
I opened the blue chest but didn’t get the Aurylene. Did I miss it?
Yes, but you didn’t break anything. The Aurylene is above the puzzle area on stacked containers. Many players leave immediately after the chest opens, but you need to reuse the Floating Crate to climb up before exiting.
Why can’t I reach the Aurylene even with the crate placed nearby?
The crate needs to be almost flush with the stacked blocks. If there’s even a small gap, the jump won’t register. I had to reposition the crate closer before the climb worked.