Close Menu

    Subscribe to Updates

    Get the latest creative news from FooBar about art, design and business.

    What's Hot

    Windrose – Multiplayer and Co-Op Guide

    February 22, 2026

    Windrose – How to Deal with Boars

    February 21, 2026

    Windrose – How to Get Clay

    February 21, 2026
    Facebook X (Twitter) Instagram
    TheGamesWatchTheGamesWatch
    • Guides
    • Features
    TheGamesWatchTheGamesWatch
    Home»Guides»Dragon Quest 7 Reimagined – Estard Underground Path Trial Room Light Puzzle Solution
    Estard Underground Path Trial Room Light Puzzle Solution - Dragon Quest 7 Reimagined
    Guides

    Dragon Quest 7 Reimagined – Estard Underground Path Trial Room Light Puzzle Solution

    By Sagnik AdhikaryFebruary 5, 2026Updated:February 5, 20263 Mins Read

    Key Points

    • Solve the light puzzle by lining up the statues so their shadows match the wall symbol.
    • Step into the light to finish the puzzle and open the path forward.
    • Move the statues freely until their shadows click into place.

    During Dragon Quest 7 Reimagined’s prologue, you’ll encounter a Light Puzzle in the Estard Underground Path, which looks confusing at first but clicks fast once you slow down. Solving this puzzle will allow you to progress the main story and obtain the Yellow Tablet Fragments. With a bit of experimentation and brainstorming, you can easily solve this Trial Room puzzle in the game.

    Also Read: DQ7 Reimagined – How to solve Pit of Silence Light Mirror Puzzle

    Dragon Quest 7 Reimagined – Estard Underground Path Light Puzzle Overview
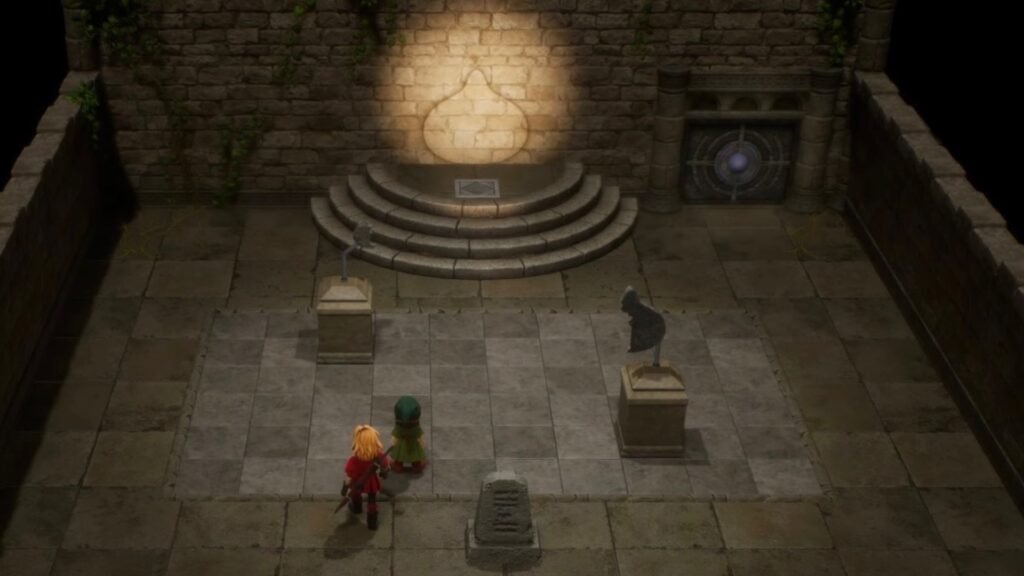
    Estard Underground Trial Room Light Puzzle in Dragon Quest 7 Reimagined.
    LocationUnderground Path at Estard, unlocked after talking to Dermot near the church.
    SolutionAlign the two statues to match their shadows according to the symbol on the wall.
    PurposeOpening the path forward to obtain the Yellow Tablet Fragment.

    How to Solve the Trial Room Light Puzzle at Estard

    To solve the Underground Path – Trial Room puzzle at Estard in Dragon Quest 7 Reimagined, you need to align the two puzzle pieces or statues by pushing them to their corresponding locations such that their shadows form a specific pattern matching the symbol on the wall. Here’s where you need to push the puzzle pieces to solve this puzzle easily.

    Puzzle Piece #1

    Moving the first statue to solve the puzzle in Dragon Quest 7 Reimagined.

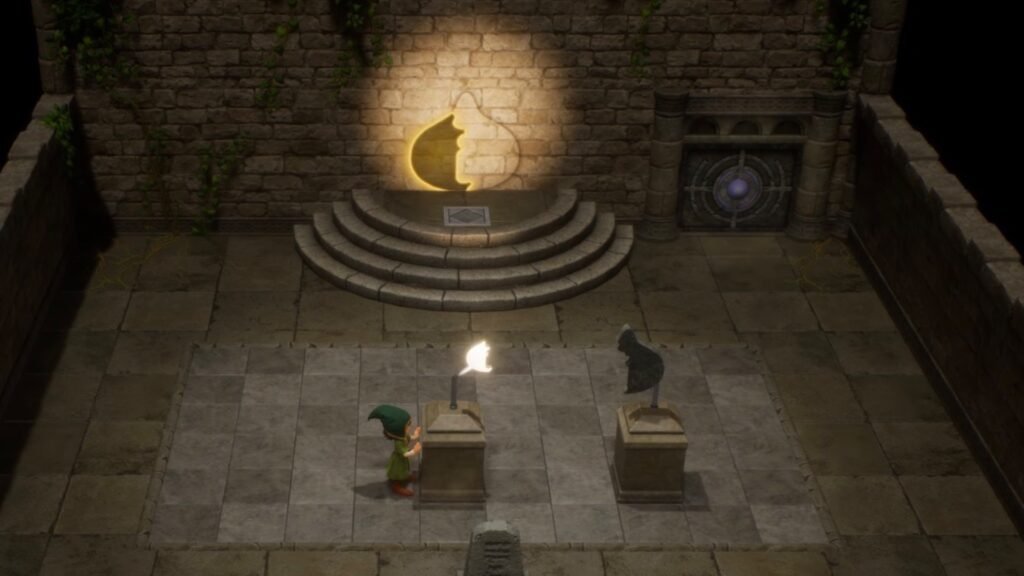
    The first puzzle piece is located to your left. You’ll notice that the pieces are situated on a stone platform with square blocks. Here’s what you need to do:

    • Get behind the first puzzle piece, and push forward thrice. Ensure that the puzzle piece is coming closer to the light source.
    • Push it to the right twice until the symbol on the wall shines.

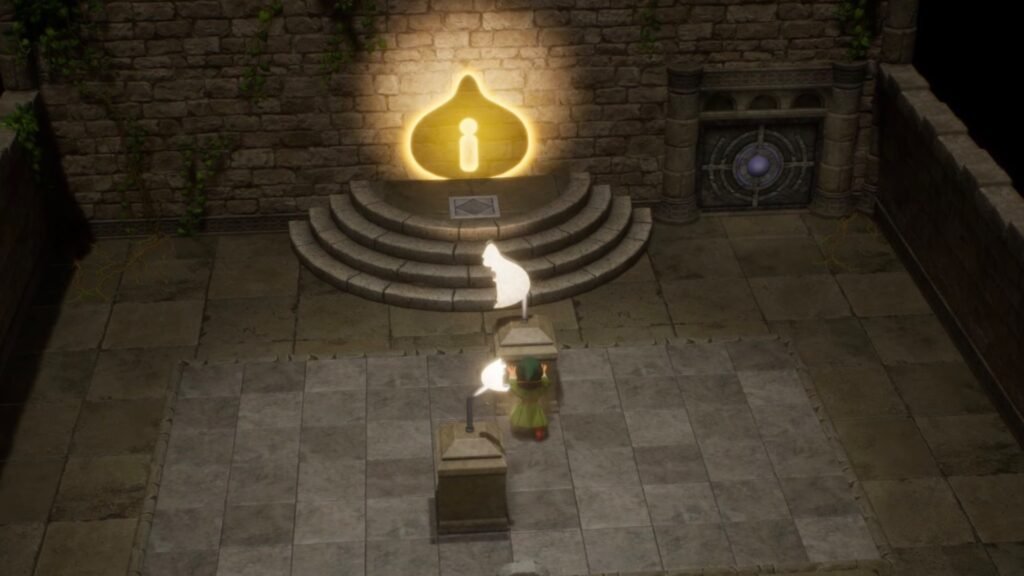
    As soon as the symbol on the wall glows, it means the puzzle piece has been matched correctly. With this out of the way, move on to the final puzzle piece at the Estard Underground Trial Room.

    Puzzle Piece #2

    Moving the second statue in Dragon Quest 7 Reimagined.

    The second puzzle piece is located to the right of the stone platform. Now, here’s how you need to place this puzzle piece to open up the way forward:

    • Push the puzzle piece three times towards the symbol on the wall.
    • Then, push it from the left twice until the pieces are completely aligned on the wall.

    The symbol on the wall will glow once again, giving you the full picture of the solved puzzle. However, this is not where the puzzle ends. All you have to do now is stand on the pressure plate at the top of the stairs, in front of the wall symbol, to solve the puzzle completely and open the way forward.

    FAQs

    Is there a penalty for messing up the puzzle?

    No, you can move the puzzle pieces as many times as you want without being penalised.

    What do I get for completing the puzzle?

    The way forward opens, leading to a boss fight against two Tribulators before you can obtain the Yellow Tablet Fragment.

    Is this puzzle missable?

    No, it’s a mandatory puzzle that you will encounter during the game’s prologue, and must be completed to continue the main story.

    Dragon Quest 7 Reimagined
    Share. Facebook Twitter Bluesky Reddit WhatsApp Copy Link
    Sagnik Adhikary

    You'll probably find me writing on video games most of the time, but when I'm not writing, you can look for me trying to hold point in Marvel Rivals or fighting an outbreak inside the undead world of Resident Evil. Sometimes, you might catch me wandering around the restless town of Silent Hill too!

    Related Posts

    Windrose – Multiplayer and Co-Op Guide

    February 22, 2026

    Windrose – How to Deal with Boars

    February 21, 2026

    Windrose – How to Get Clay

    February 21, 2026

    Best Base Locations in HumanitZ 1.0

    February 21, 2026

    Poppy Playtime Chapter 5 – How to Escape the Elevator Shaft

    February 20, 2026

    Windrose – How to Get a Ship

    February 20, 2026
    EDITOR'S PICKS

    Windrose – Multiplayer and Co-Op Guide

    February 22, 2026

    Windrose – How to Deal with Boars

    February 21, 2026

    Windrose – How to Get Clay

    February 21, 2026

    Best Base Locations in HumanitZ 1.0

    February 21, 2026
    DON'T MISS
    Guides

    NMS Remnant – How To Unlock All 13 New Colossus Parts

    Sagnik Adhikary
    Guides

    ARC Raiders – Where to Get New Augments (Headwinds update)

    Santosh Panda
    Guides

    Half Sword – How to Loot the Cart

    Kirthana K
    Guides

    Fisch – How To Get Cupid’s Embrace Rod

    Sagnik Adhikary
    Features

    Unbeatable First Impressions: An Imaginative Anime Infused Rhythm Game with a Shallow Demo Showcase

    Santosh Panda
    Guides

    Ashes of Creation – Complete Guide to Forsaken Emblems

    Amar Deogaonkar
    Guides

    MENACE – How to Complete Defense Missions

    Kirthana K
    Guides

    Half Sword – How to Make Enemies Surrender

    Sagnik Adhikary
    Guides

    Avatar From the Ashes DLC – How To Get Battle of Ayram Alusing Armor

    Kirthana K
    Guides

    StarRupture – How to get & use Titanium Ore

    Santosh Panda
    © 2026 TheGamesWatch
    • Home
    • Our Authors
    • About Us
    • Privacy Policy

    Type above and press Enter to search. Press Esc to cancel.

    We use cookies to ensure that we give you the best experience on our website. If you continue to use this site we will assume that you are happy with it.